MidiPlay
A Windows program to play Midi files
To view the score:
-
If the MIDI file contains just the choir parts with piano
accompaniment then click on the
 button on the toolbar,
or
in the Views drop-down menu click on Full score (all tracks).
-
If the MIDI file contains all the orchestral parts then you probably want to see just the choir parts
(or whatever instruments you're interested in),
so:
-
In the window showing the track names (click on Views, then Tracks if necessary),
select the parts you want (by clicking on each one in turn).
-
Click on the
 button on the toolbar,
or
in the Views drop-down menu click on Full score (selected tracks).
-
The other score buttons


 and menu options display a short score or scores of the individual parts.
-
If you have enabled
Show score after opening file
then the full score with all tracks
will appear whenever you open a MIDI file.
-
Note that the score display is not perfect. In particular, it has to guess what accidentals to use
(eg. is it a G-sharp or an A-flat?)
and sometimes
it makes the wrong choice.
-
The score window displays a vertical line, showing the current position,
while the music is playing. This can be toggled on and off
in the MIDI drop-down menu by clicking on Follow score.
Changing the size of the score:
-
The music in a score window can be made bigger or smaller by hitting Alt+B or Alt+S (multiple times if necessary).
Or you can change the size of the music in
the User Preferences window.
All of these also affect the size of the music when it is printed.
Printing the score:
-
The music in a score window can be printed - click on the
 button on the toolbar,
or
in the File menu click on Print....
-
To preview the printout,
click on the
 button on the toolbar,
or
in the File menu click on Print Preview.
-
To choose a printer, or to change the page size or orientation,
click on the
 button on the toolbar,
or
in the File menu click on Print Setup....
To change the volumes of the various parts:
-
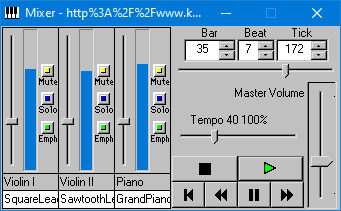
In the Mixer (see picture below), use the following buttons and controls:
-
Click on a Solo button to hear just that part.
-
Click on a Mute button to mute that part.
-
Click on an Emph button to emphasise that part and make the other parts quieter
(you can control the amount of emphasis in
the User Preferences window).
-
Click and drag
the Tempo slider
to adjust the tempo relative to what is specified in the MIDI file.
-
Adjust the volume of each part
by clicking and dragging its slider
(as you make one part louder the others get quieter).
-
Click and drag
the Master Volume slider
to change the volumes of all the parts.
-
Right-click on any volume slider to set it back to normal volume.
To play the parts on different instruments:
-
If the Instruments window is not already open then click on the
 button on the toolbar to open it
(or
in the Dialogs drop-down menu click on Instruments...).
-
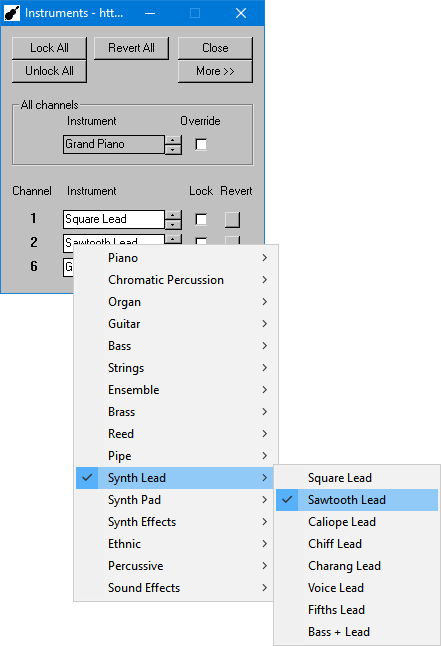
In the Instruments window (see picture below) you can change the instrument for each
channel by clicking on the instrument and choosing from the drop-down
menu, or by using the up/down buttons. This will check the Lock box for
that channel to prevent the MIDI file from using its own instrument for
that channel. Click on the Revert button to revert to the instrument
settings in the MIDI file.
-
If you want to hear all the parts played on the piano then check the
All channels - Override box. Or you can use a different instrument by
clicking on the All channels - Instrument and choosing from the drop-down
menu, or by using the up/down buttons. Uncheck the All channels - Override
box to use the individual instruments for the parts.
To choose which MIDI output device to use:
-
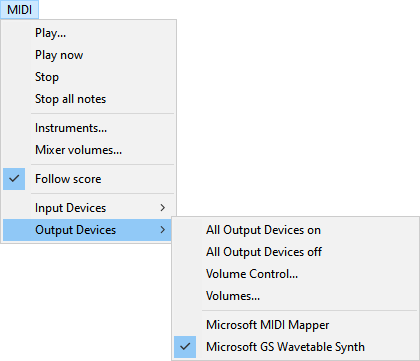
In the MIDI drop-down menu (see picture below),
click on Output Devices,
then
click on All Output Devices on
- this will open all your MIDI output devices.
-
Or you can use a particular MIDI output device or a combination of them
by clicking on them in the Output Devices drop-down menu (they appear below the separator line) to toggle them on or off.
-
Note that if you have more than one
MIDI output device turned on then you might hear an echo while the music is playing.
-
Volume Control... opens the Windows Master Volume window.
-
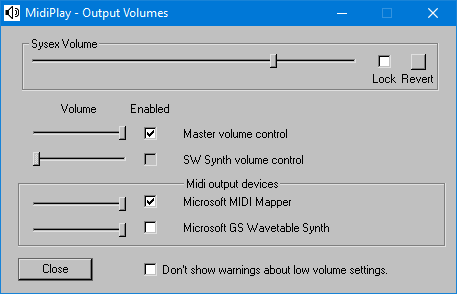
Volumes... opens the Output Volumes window (see picture below), which shows:
-
The Sysex Volume slider
(System Exclusive Volume messages (F0 7F 04 01)
occur in some MIDI files, but not all)
-
A slider and a checkbox for the Windows Master volume control
-
A slider and a checkbox for the Windows SW Synth volume control (not used in some versions of Windows)
-
A slider and a checkbox for each MIDI output device
-
If you play some music, and MidiPlay thinks there might be no sound output, it will open the
Output Volumes window and warn you about the problems it has spotted
thus
 .
You should try to clear all the warnings by enabling devices and turning up volumes.
You can disable these warnings by checking the "Don't show warnings" checkbox.
Playing the music several times:
-
To display the Repeat window:
-
click on the
 button on the toolbar, or
-
click on Dialogs in the MidiPlay menu bar,
and then
click on Repeat... in the drop-down menu.
-
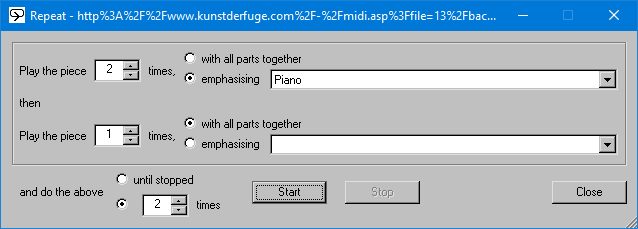
In the Repeat window (see picture below), you can specify how many times to play the piece:
-
with all parts played at normal volume
-
with a particular part emphasised
(you can control the amount of emphasis in
the User Preferences window)
User Preferences:
-
To display the User Preferences window,
click on Dialogs in the MidiPlay menu bar,
and then
click on User Preferences... in the drop-down menu.
-
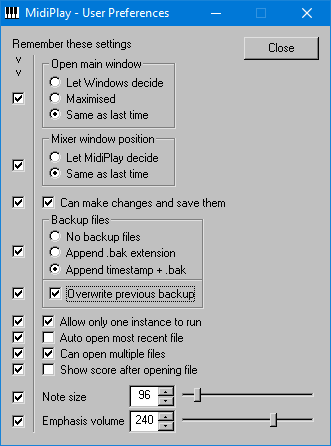
In the User Preferences window (see picture below), you can set various preferences,
and save them to be used next time:
-
How MidiPlay's main window should appear when MidiPlay is run.
-
Where MidiPlay's Mixer window should appear when a MIDI file is opened.
-
Whether MIDI files
can be changed,
and how
backup files
should be named.
-
Whether only one instance of MidiPlay can be run at a time.
-
Whether to automatically reopen the most recently used MIDI file when MidiPlay is run.
-
Whether more than one MIDI file can be opened at the same time.
-
Whether to automatically display the score when a MIDI file is opened.
-
How big to display the music in the score.
-
How much to emphasise a part when
its Emph button is pressed in the Mixer,
or
its Play button is pressed in the Tracks window.
Transposing the music:
-
To display the Transpose window,
click on Dialogs in the MidiPlay menu bar,
and then
click on Transpose... in the drop-down menu.
-
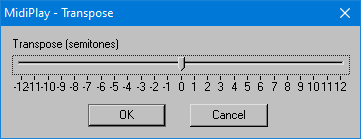
In the Transpose window (see picture below):
-
Click and drag the slider
to transpose the music up or down by up to one octave
-
Click on OK
-
All notes in the piece are transposed. Key signatures are converted as well.
-
Very high or very low notes are moved down or up an octave if necessary to keep them within the MIDI range (C-1 to G9).
-
Note that this way of transposing the music changes all the notes and key signatures,
and so is different from the transpose function in the
Play window.
Making changes to a MIDI file:
MidiPlay has some very low-level editing abilities.
Individual MIDI events can be added, deleted, or changed.
In
the User Preferences window,
turn on
Can make changes and save them,
and choose whether you want:
- no backup files
- backup files with just ".bak" appended to the file name
- timestamped backup files
You can then add, delete, or change the following:
-
Key signatures – click on the
 button on the toolbar,
or
in the Views drop-down menu click on Key Signatures.
-
Time signatures – click on the
 button on the toolbar,
or
in the Views drop-down menu click on Time Signatures.
-
Tempo settings – click on the
 button on the toolbar,
or
in the Views drop-down menu click on Tempi.
To add, delete, or change a line in the Key Signatures, Time Signatures, or Tempi windows,
right-click on the line
and then click on
Add...,
Delete,
or
Modify....
You can also add, delete, or change individual MIDI events.
In the window showing the track names (click on Views, then Tracks if necessary),
select the track you want to change (by clicking on it), then
click on Diagnostics in the MidiPlay menu bar,
and then
click on Track MIDI info in the drop-down menu.
This opens a window showing all the MIDI events in the track.
To add, delete, or change a line,
right-click on the line
and then click on
Add...,
Delete,
or
Modify....
If you want to save your changes,
click on File in the MidiPlay menu bar,
and then
click on Save or Save as... in the drop-down menu.
Other menu commands:
-
File menu:
-
Open from directory... – opens a MIDI file from the same directory as the current MIDI file
-
Open directory – opens the directory of the current MIDI file
-
Close – closes the current MIDI file
-
Close all – closes all open MIDI files
-
Exit – closes all open MIDI files and closes MidiPlay
-
Dialogs menu:
-
Keyboard... – opens a keyboard window, which shows the notes as they are played.
Mouse clicks on the keys will play the notes.
-
MIDI Thru... – opens the MIDI Thru window:
-
MIDI Thru can be enabled,
meaning that MIDI events received on a MIDI input device will be sent to all enabled MIDI output devices.
-
Notes can be transposed by a number of
semitones
and
cents.
-
The music can be inverted, meaning
for example that MIDI note 60 (middle C) becomes note 127 - 60 = 67 (the G above middle C).
Major chords become minor, and minor chords become major.
Diminished 7th chords remain diminished 7ths.
Augmented triads remain augmented triads.
- Play... – opens the Play window, in which various things can be controlled:
-
Running time – the current position in the music
-
Relative tempo – click and drag the slider
to adjust the tempo relative to what is specified in the MIDI file.
-
Tempo – click and drag the slider
to set a fixed tempo, regardless of what is specified in the MIDI file.
-
Transpose – click and drag the slider
to transpose the music up or down by up to one octave.
Note that this way of transposing the music simply changes notes on the fly as they are played,
and so is different from the transpose function in the
Transpose window.
-
Help > About... – displays the About box.
-
There are various other menu commands, but they are not intended for normal use.
MidiPlay main page
Stapleford Choral Society website
All text and images on this website are © Copyright Chris Hills 1982–2025, or their respective copyright holders.
 button on the toolbar,
or
in the Views drop-down menu click on Full score (all tracks).
 button on the toolbar,
or
in the Views drop-down menu click on Full score (selected tracks).


 and menu options display a short score or scores of the individual parts.
 button on the toolbar,
or
in the File menu click on Print....
 button on the toolbar,
or
in the File menu click on Print Preview.
 button on the toolbar,
or
in the File menu click on Print Setup....

 button on the toolbar to open it
(or
in the Dialogs drop-down menu click on Instruments...).


 .
You should try to clear all the warnings by enabling devices and turning up volumes.
You can disable these warnings by checking the "Don't show warnings" checkbox.
 button on the toolbar, or


 button on the toolbar,
or
in the Views drop-down menu click on Key Signatures.
 button on the toolbar,
or
in the Views drop-down menu click on Time Signatures.
 button on the toolbar,
or
in the Views drop-down menu click on Tempi.